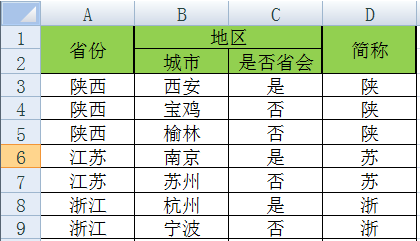
举个简单的例子,就是这样:

思路:openpyxl有一个border方法可以给单元格设置边框,同时需要设置上下左右四个方向。我们先得到这片区域的最外层的单元格们,分四个方向,我们给最左边一排的单元格设置左边框为粗线,其他三边为细线,其他三个方向的单元格方法一样。
代码示例:
import openpyxl
from openpyxl.styles import Side, Border, colors

#定义边框样式
def my_border(t_border, b_border, l_border, r_border):
    border = Border(top=Side(border_style=t_border, color=colors.BLACK),
                    bottom=Side(border_style=b_border, color=colors.BLACK),
                    left=Side(border_style=l_border, color=colors.BLACK),
                    right=Side(border_style=r_border, color=colors.BLACK))
    return border

#初始化制定区域边框为所有框线
def format_border(s_column, s_index, e_column , e_index):
    for row in tuple(sheet[s_column + str(s_index):e_column + str(e_index)]):
        for cell in row:
            cell.border = my_border('thin', 'thin', 'thin', 'thin')

#给指定区域设置粗匣框线
def set_solid_border(area_list):
    for area in area_list:
        s_column = area[0]
        s_index = area[1]
        e_column = area[2]
        e_index = area[3]
        #设置左粗框线
        for cell in sheet[s_column][s_index - 1:e_index]:
            cell.border = my_border(cell.border.top.style, cell.border.bottom.style,
                                    'medium', cell.border.right.style)
        # 设置右粗框线
        for cell in sheet[e_column][s_index - 1:e_index]:
            cell.border = my_border(cell.border.top.style, cell.border.bottom.style,
                                    cell.border.left.style, 'medium')
        # 设置上粗框线
        for row in tuple(sheet[s_column + str(s_index):e_column + str(s_index)]):
            for cell in row:
                cell.border = my_border('medium', cell.border.bottom.style,
                                        cell.border.left.style, cell.border.right.style)
        # 设置下粗框线
        for row in tuple(sheet[s_column + str(e_index):e_column + str(e_index)]):
            for cell in row:
                cell.border = my_border(cell.border.top.style, 'medium',
                                        cell.border.left.style, cell.border.right.style)


if __name__ == '__main__':
    wb = openpyxl.load_workbook('test.xlsx')
    sheet = wb['Sheet1']
    format_border('A', 3, 'D', 10)
    set_solid_border([['A', 3, 'D', 5], ['A', 6, 'D', 7], ['A', 8, 'D', 10],
                      ['A', 3, 'A', 10], ['B', 3, 'C', 10], ['D', 3, 'D', 10]])
    wb.save('test.xlsx')
运行结果如下:

设置完粗框线的表格是不是层次分明,更加美观了呢?更多Python实用知识,点击进入PyThon学习网教学中心。


