本教程操作环境:windows7系统、java10版,DELL G3电脑。
1、改变Spring启动时候的图标
这一步太简单了,就是在Spring项目下的resources文件夹下加一个banner.txt即可。
这个时候你可以创建完了文件之后,随便加一些符号尝试一下即可。
2、自定义图案
可以找到一个心仪的图片,然后通过下方程序自动生成符号图案。
import javax.imageio.ImageIO;
import javax.swing.*;
import java.awt.*;
import java.awt.image.BufferedImage;
import java.io.File;
import java.io.IOException;
public class AscPic {
    public static void main(String[] args) throws IOException {
        String path = "d:/heart3.jpg";//导入的图片
        String base = "love";//将会用这个字符串里的字符填充图片
        BufferedImage image = ImageIO.read(new File(path));//读入图片,并用图片缓冲区对象来接收
        float scale = (float) 1;
        //获取缩放后的宽高
        int width = (int) (image.getWidth()*scale)*3;
        int height = (int) (image.getHeight()*scale);
        //调用缩放方法获取缩放后的图片
        Image img = image.getScaledInstance(width , height, Image.SCALE_DEFAULT);
        image = toBufferedImage(img);
        int[][] imageArray = new int[image.getHeight()][image.getWidth()];
        int[] sum = new int[image.getWidth()];
        int cnt = 0;
        //双层for循环,遍历图片
        for (int y = 0; y < image.getHeight(); y++) {//先竖向遍历,再横向遍历,即一行一行的找,后面也会一行一行的打印
            for (int x = 0; x < image.getWidth(); x++) {
                int color = image.getRGB(x, y);//图片缓冲区自带的方法,可以得到当前点的颜色值,返回值是int类型
                int r=(color>>16)&0xff;
                int g=(color>>8)&0xff;
                int b=color&0xff;
                float gray = 0.299f * r + 0.578f * g + 0.114f * b;//灰度值计算公式,固定比例,无需理解
                int index = Math.round(gray * (base.length()) / 255);
                if(index>=base.length()) {
                    imageArray[y][x] = -1;
                }else {
                    imageArray[y][x] = cnt++;
                    sum[x]+=index;
                }
            }
        }
        for(int i = 0;i<image.getHeight();i++){
            for(int j = 0;j<image.getWidth();j++){
                if(sum[j]==0) continue;
                else if(imageArray[i][j]==-1)
                    System.out.print(" ");//白色的地方打空格,相当于白色背景,这样图片轮廓比较明显
                else
                    System.out.print(base.charAt(imageArray[i][j]%base.length()));//有颜色的地方打字符
            }
            System.out.println();//一行打完,换行
        }
    }
    public static BufferedImage toBufferedImage(Image image) {
        if (image instanceof BufferedImage) {
            return (BufferedImage) image;
        }
        image = new ImageIcon(image).getImage();
        boolean hasAlpha = false;
        BufferedImage bimage = null;
        GraphicsEnvironment ge = GraphicsEnvironment
                .getLocalGraphicsEnvironment();
        try {
            int transparency = Transparency.OPAQUE;
            if (hasAlpha) {
                transparency = Transparency.BITMASK;
            }
            GraphicsDevice gs = ge.getDefaultScreenDevice();
            GraphicsConfiguration gc = gs.getDefaultConfiguration();
            bimage = gc.createCompatibleImage(image.getWidth(null), image
                    .getHeight(null), transparency);
        } catch (HeadlessException e) {
        }
        if (bimage == null) {
            int type = BufferedImage.TYPE_INT_RGB;
            if (hasAlpha) {
                type = BufferedImage.TYPE_INT_ARGB;
            }
            bimage = new BufferedImage(image.getWidth(null), image
                    .getHeight(null), type);
        }
        Graphics g = bimage.createGraphics();
        g.drawImage(image, 0, 0, null);
        g.dispose();
        return bimage;
    }
}
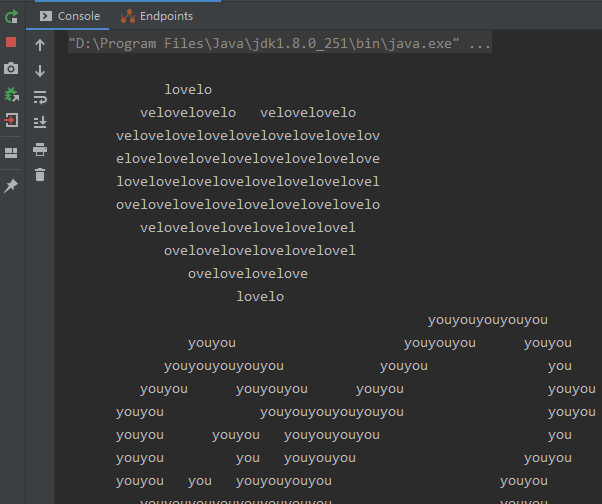
3、通过运行上面的代码+这个简单的图案,可以生成一个灰白色的比心图案,如下所示

以上就是在java中制作比心图案的方法,心动不如行动,大家看完后也动手试试这种方法吧,最后希望大家在今天的节日中愉快的度过~更多Java学习指路:java教程


